Are you trying to resize a QR code only to end up with a blurry, unscannable result? Getting the dimensions wrong – or using the wrong file format – can make your QR code completely useless after printing. This guide walks you through exactly how to resize a QR code correctly, covering file formats, size rules, resolution requirements, and the most common mistakes to avoid.
Why Resizing a QR Code Goes Wrong
Most QR code quality problems come down to one of two issues: starting with the wrong file format or scaling an image beyond what its resolution can support.
When you take a low-resolution raster image – a JPEG or a small PNG – and stretch it larger in your design software, the scanner has to read blurry, indistinct modules instead of crisp black-and-white squares. Stretching a low-resolution QR code is one of the most reliable ways to produce a blurry, unscannable print result. There’s also a less obvious problem: resizing can unintentionally distort the code’s proportions or strip away the quiet zone – the clear white margin surrounding the code – which causes scanners to misread or completely miss the pattern. Understanding these failure points before you resize is the most direct path to a code that actually works.
Vector vs. Raster: The File Format Decision That Matters Most
The single most impactful choice you make when resizing a QR code is whether you’re working with a vector or raster file.
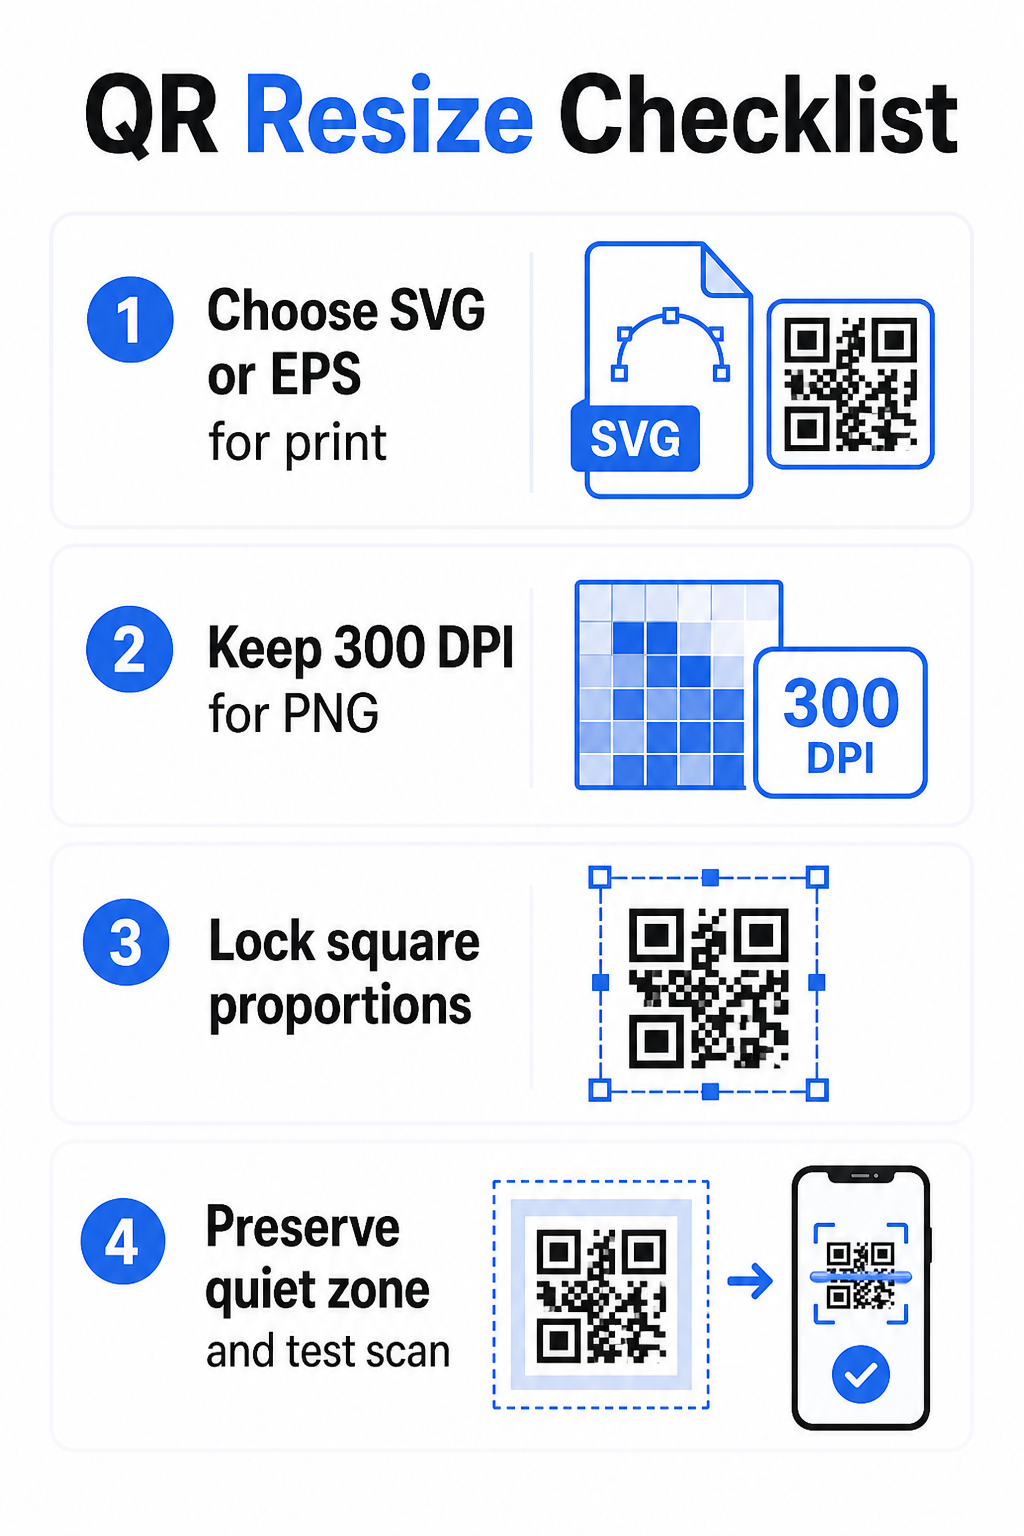
Vector formats (SVG, EPS, PDF) store the QR code as mathematical instructions rather than a fixed grid of pixels. This means they scale to any size – from a postage stamp to a billboard – without any loss of sharpness or clarity. For anything going to print, vector is the correct choice.
Raster formats (PNG, JPEG, BMP) store the code as a pixel grid with a fixed resolution ceiling. Once you scale them above their original resolution, the software has to invent pixel data, which produces blurring. JPEG is particularly problematic because its compression algorithm smooths edges, directly undermining the sharp contrast a QR scanner needs to read each module.
| 格式 | Scales Without Loss | 建议用于 | 说明 |
|---|---|---|---|
| SVG | 是 | Print, large format | Best overall for resizing |
| EPS | 是 | Professional print | Standard in print design workflows |
| 是 | Print, sharing | Preserves vector data | |
| 巴新 | No (fixed resolution) | Web, digital display | Acceptable at high resolution |
| JPEG | No (lossy compression) | Neither | Avoid entirely for QR codes |
When you download a QR code for printing, always select SVG or EPS. When you need a raster file for a digital screen or a platform that doesn’t accept vector formats, export a high-resolution PNG – never a JPEG.
Create Print-Ready QR Codes in the Right Format Generate your QR code and download it as a print-ready SVG, EPS, or PDF file using the Pageloot QR码生成器. No design software required.
Resolution Rules for Raster Files
If you’re working with a PNG for print, resolution – measured in DPI (dots per inch) – determines whether the code stays sharp at its final printed size.
The minimum standard for print is 300 DPI at the final printed dimensions. This means the pixel dimensions of your image file must match the intended physical size at that density. For example:
- A QR code printed at 1 inch × 1 inch needs at least 300 × 300 pixels
- A QR code printed at 4 inches × 4 inches needs at least 1,200 × 1,200 pixels
If your file doesn’t meet this threshold at your target size, the individual modules – the tiny squares that carry the QR data – will blur together. At that point, the scanner can no longer distinguish dark from light, and the code fails. For digital screens, a minimum of roughly 240 × 240 pixels is a practical guideline for on-screen display codes, though larger is always safer for zoom and cross-device compatibility. The cleaner solution for print is to skip raster entirely and use a vector file, which gives you infinite scalability with zero resolution concerns.
How to Resize a QR Code Step by Step
Step 1: Start with the Right Source File
Download or export your QR code in SVG or EPS format if it’s going to print. If you only have a raster file, verify that the pixel dimensions support 300 DPI at your target print size before resizing. A PNG QR code can work well for digital placements when exported at sufficient resolution – you can create one directly with a PNG二维码生成器 and use it wherever transparency or raster compatibility is required.
Step 2: Scale Proportionally
Always maintain the original aspect ratio when resizing. QR codes are square by definition, and stretching them horizontally or vertically distorts the modules from squares into rectangles, which can confuse or defeat scanners. In any design application – Illustrator, Canva, InDesign, Photoshop – lock the aspect ratio before dragging a corner handle. Even a subtle distortion is enough to cause problems with stricter scanner implementations.
Step 3: Preserve the Quiet Zone
The quiet zone is the clear white border surrounding the QR code on all four sides. The ISO/IEC 18004 standard specifies that this margin must be at least four modules wide on every side. When you resize a QR code and place it within a larger design, this zone is frequently the first thing that gets cropped or encroached upon by other design elements. If each module in your code is 2 mm wide, your quiet zone must be at least 8 mm on all sides. Treat this space as non-negotiable – removing it breaks scanner recognition.
Step 4: Check Contrast After Resizing
Resizing onto a colored or textured background can reduce the effective contrast between the code’s modules and its surroundings. Scanners rely on the difference between dark and light areas to read the code. The safest combination remains dark modules on a light background – black on white provides a 21:1 contrast ratio. Aim for a minimum contrast ratio of 4:1 between foreground and background colors, and avoid placing the code on gradients, busy patterns, or reflective surfaces. For detailed guidance, see 二维码颜色对比度最佳实践.
Step 5: Test Before Printing
Print a proof at the exact intended size on the exact intended material, then test with multiple devices – both iOS and Android – before committing to a full production run. Test at the actual scanning distance users will experience. A code that scans perfectly at arm’s length may fail at the distance it’s actually placed. See how to test QR codes for mobile usability for a full testing checklist.
Minimum and Maximum Size Guidelines
Resizing a QR code responsibly means knowing the size boundaries for your specific use case. The core rule is the 10:1 距离与尺寸比: the maximum intended scanning distance should be approximately ten times the width of the QR code. A code scanned from 20 inches away should be at least 2 inches wide; one scanned from 5 feet away should be at least 6 inches wide; a billboard code scanned from 30 feet away should be at least 36 inches wide.
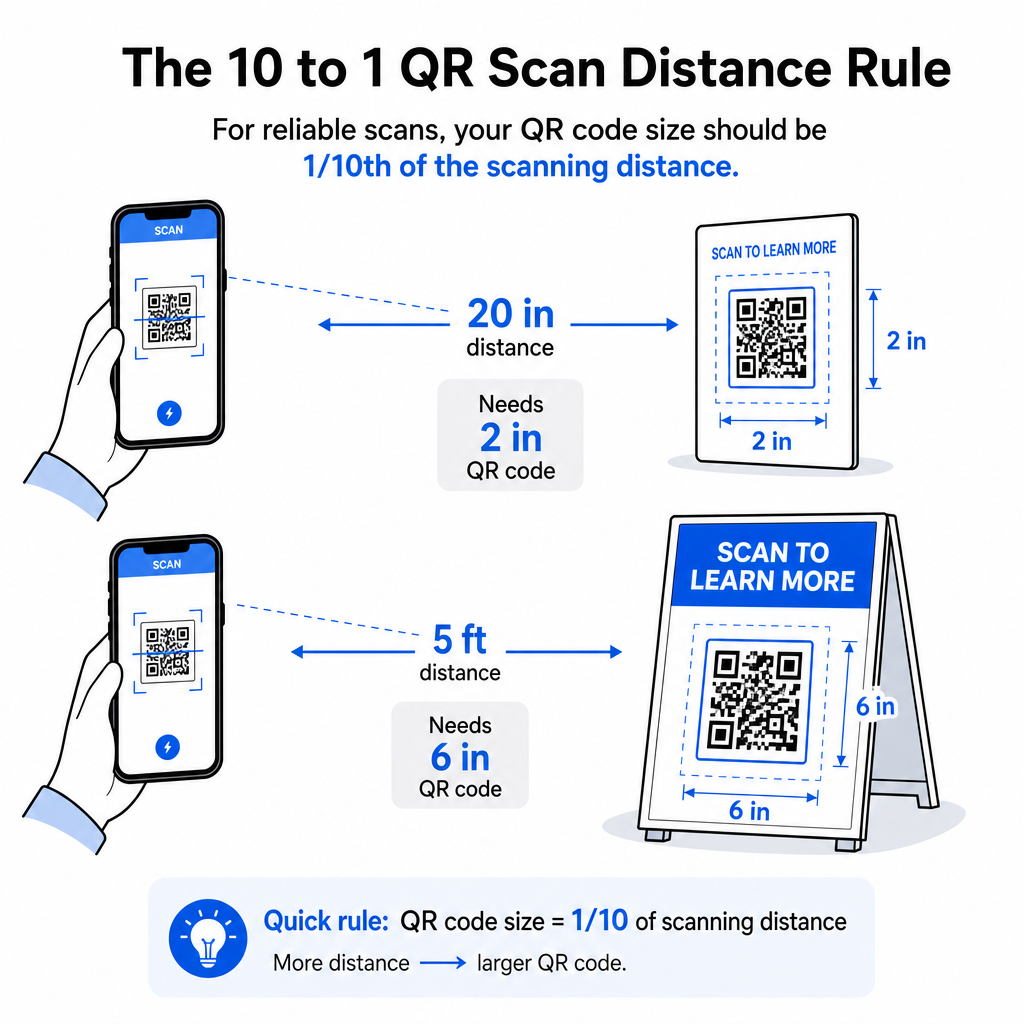
For common print applications, here are reliable starting points:
| 用例 | Minimum Recommended Size |
|---|---|
| 商业名片 | 0.8 × 0.8 英寸 (2 × 2 厘米) |
| Flyers and brochures | 1.2 × 1.2 英寸 (3 × 3 厘米) |
| Posters and signage | 1.6 × 1.6 in (4 × 4 cm) |
| Billboards and banners | 16 × 16 in (40 × 40 cm) or larger |
For business card applications, 0.8 × 0.8 inches is the practical minimum for reliable close-range scanning – going smaller increases the risk of scan failure significantly. See the guide to QR code sizes for business cards for specific recommendations on that format. There is no official upper size limit; scale up as needed based on the scanning distance. For a comprehensive breakdown across every use case, the 二维码尺寸指南 covers everything from business cards to billboards. You can also explore 二维码尺寸如何影响可见性 to understand the broader relationship between dimensions and scan success.
Need a QR Code for Your Business Card? 使用 名片二维码生成器 to create a code sized and designed for business card printing, with SVG export included.
How Data Density Affects Resizing
One factor that complicates resizing is data density – the amount of information encoded in the QR code. The more data a QR code contains, the denser its grid of modules becomes. Denser grids require larger physical sizes to keep individual modules readable at the camera level.
A QR code encoding a long URL with tracking parameters contains far more data than one pointing to a short redirect URL. When you shrink a high-density code, the modules become too small for most smartphone cameras to resolve reliably. Dynamic QR codes solve this problem directly. Instead of encoding a full destination URL, a dynamic code encodes a short internal redirect, keeping the code’s data density low regardless of where it points. This means you can print the code smaller without sacrificing scannability – and update the destination later without reprinting.
Error Correction and Resizing Tolerance
QR codes include built-in error correction that allows them to remain scannable even when partially damaged or obscured. The ISO/IEC 18004 standard defines four levels:
| 级别 | Recovery Capability |
|---|---|
| L(低) | ~7% of data |
| M(中型) | ~15% of data |
| Q(四分位数) | ~25% of data |
| H(高) | ~30% of data |
If you’re resizing a QR code to a smaller size, or adding a logo to the center of the code, increasing the error correction level gives you a buffer against module-level damage or scanning imprecision. Level Q or H is appropriate for branded or heavily customized codes. Keep in mind that higher error correction increases data density, which may require a slightly larger minimum size to compensate.
Common Resizing Mistakes to Avoid
- Using a screenshot as your source file. Screenshots are low-resolution raster captures. Enlarging them for print is one of the most common causes of unscannable QR codes.
- Stretching the code non-proportionally. Even a slight horizontal or vertical distortion changes module shapes from squares to rectangles, which can prevent scanners from reading the code correctly.
- Cropping the quiet zone. Resizing within a tight design layout often results in other elements encroaching on the quiet zone. Keep at least four modules of clear space on all sides – this margin is a technical requirement, not a stylistic choice.
- Assuming a code that works on screen will work in print. Screen display and printed output are different environments. A code that looks sharp at 72 DPI on screen may print blurry at 300 DPI if the underlying file resolution doesn’t support it.
- Not testing after resizing. Always verify scannability on the final material, at the final size, from the intended scanning distance.
For more in-depth guidance, the 二维码打印分辨率指南 和 二维码可读性的最佳实践 cover the print-specific details worth knowing before you go to production.
Sizing for Different Printing Materials
The surface you’re printing on affects how large your QR code needs to be, separate from scanning distance considerations. Rough, textured, or curved surfaces can distort modules and reduce effective contrast, requiring you to scale up beyond what the 10:1 rule alone would suggest.
- Smooth paper or cardstock – Standard size guidelines apply; matte finishes are preferred over glossy to reduce glare and reflections
- Corrugated cardboard – Add 10–25% to the minimum size to compensate for surface texture and edge irregularities
- 织物 – Smooth polyester can use standard minimums; rough or stretchy textiles often require 25–50% larger codes
- Metal or glass – High reflectivity causes scanning problems; use matte surfaces or vinyl overlays and increase the code size
For a full breakdown by material type, see 不同印刷材料的二维码尺寸, and for guidance on how the printing method itself affects output quality, 打印技术如何影响二维码的可扫描性 is worth reading before you place a print order. For placement decisions that go beyond sizing, the QR code placement guide for marketing covers positioning by material type and campaign context.
Properly resizing a QR code means choosing the right file format before you resize, maintaining proportions and quiet zone margins throughout, and verifying your output meets resolution and contrast standards at the final printed or displayed size. Starting with a vector file removes most of the risk entirely – it scales cleanly in any direction without the resolution ceiling that raster images impose. If you’re building QR codes for ongoing campaigns, using a 动态二维码 gives you the additional advantage of updating the destination after printing, so a sizing or placement decision today doesn’t lock you into reprinting costs down the road.
常见问题
SVG, EPS, or PDF are the best formats for resizing because they are vector-based and scale to any size without losing sharpness. PNG is acceptable for digital use when exported at high resolution. JPEG should be avoided entirely – its compression smooths the sharp edges that scanners need to distinguish each module.
The practical minimum for most close-range print applications is 0.8 × 0.8 inches (2 × 2 cm). Going smaller increases the risk of scan failure. For scanning at greater distances, apply the 10:1 rule: the code’s width should be at least one-tenth of the maximum intended scanning distance – so a code scanned from 20 inches away should be at least 2 inches wide.
No – the encoded data and error correction level are fixed when the code is generated. Resizing changes only the physical or pixel dimensions of the image. What resizing can affect is whether the modules remain clear and distinguishable at the new size, which is why maintaining 300 DPI for print, preserving the quiet zone margins, and scaling proportionally are all essential steps.